Summary
Editor's rating
Is it worth the money for what it does?
Simple wedge design that doesn’t scream for attention
Materials: more solid than cheap plastic, but not indestructible
Holding up outside: weather, daily use and small knocks
Installation: easy if you know a drill, a bit fiddly if you don’t
What you actually get in the box
Does it actually improve the camera view?
Pros
- Clearly improves the camera viewing angle on compatible J-series doorbells
- Feels sturdier than typical thin plastic mounts, with stainless steel screws for outdoor use
- Compact, discreet design that doesn’t make the doorbell look bulky or strange
Cons
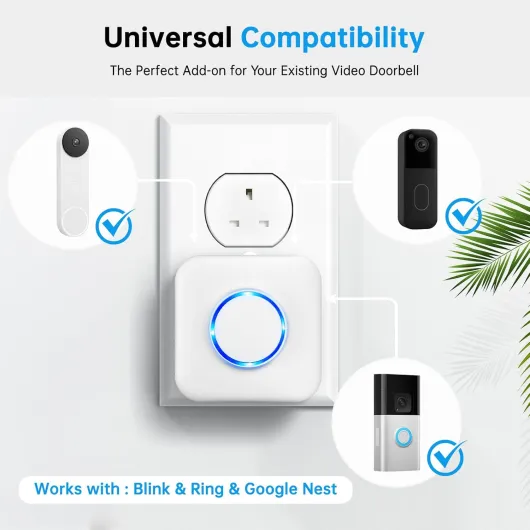
- Very limited compatibility: does not work with Ring, Blink, Tapo, eufy or other brands
- Instructions are basic and angle choice isn’t super precise, so installation needs some trial and error
Specifications
View full product page →| Brand | KAMEP |
Finally pointing the doorbell where it should look
I bought this KAMEP angle mount because my video doorbell was basically filming the street and my neighbour’s car more than my own doorstep. The camera was stuck flat against the wall, and I couldn’t see who was standing right next to the door. I didn’t want to move the whole doorbell wiring, so a wedge bracket sounded like the easiest fix.
For context, my doorbell is one of the compatible J-series models (J9 in my case), so I knew at least on paper this mount should fit. I’m not handy at all, so I was looking for something that I could put up with a basic drill and a screwdriver, without spending my whole Saturday swearing at the wall. The promise here is simple: tilt the camera between 25–50° left or right, or slightly up/down, and improve the view.
After installing and using it for a bit, I’d say it does what it’s supposed to: it changes the viewing angle in a pretty noticeable way, and the doorbell finally points where I actually need it. It’s not some fancy gadget; it’s just a shaped piece of material with screws, but that’s really all this kind of product needs to be.
It’s not perfect though. The angle range is good but not ultra precise, the instructions could be clearer, and if your door frame is weird or very uneven, you’ll probably have to fiddle with it a bit. Still, for the price, if you already have a compatible KAMEP-style doorbell and your current view is useless, this bracket is a pretty solid, practical upgrade.
Is it worth the money for what it does?
In terms of value, this is a pretty straightforward calculation: you’re paying for a small piece of hardware that solves a specific annoyance. It doesn’t add new smart features, it doesn’t change the app, it just fixes the camera angle. For me, having the doorbell actually see my doorstep instead of half the street is worth the price of this mount. It’s cheaper and less hassle than moving the wiring or buying a new doorbell with a different bracket.
What I liked is that the kit is complete: mount, screws, wall plugs, and it’s tailored to the J-series doorbells. You don’t have to hunt for compatible screws or drill random extra holes. The material feels better than the ultra-cheap plastic mounts you sometimes get thrown in for free with generic doorbells. Considering this, the price feels reasonable for what you get, not a bargain but not overpriced either.
On the downside, this mount is very specific. If you ever change brand (for example, switch from a J9 to a Ring or eufy later), this bracket will probably become useless. It’s not a universal solution you can reuse on anything. Also, if your door positioning is really extreme, there’s a chance the angle range still won’t be enough, and then you’ve spent money for a partial fix. That’s why it’s smart to look carefully at your current view and think about which direction and how much you need to tilt before buying.
Overall, I’d say the value is good but not mind-blowing. If you already own a compatible KAMEP-style J-series doorbell and your current view is bad, this mount is a practical, relatively low-cost way to improve it. If your doorbell view is already decent or you’re planning to change systems soon, you can probably skip it and save the money.
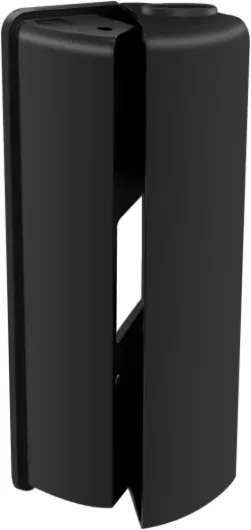
Simple wedge design that doesn’t scream for attention
Design-wise, there’s nothing flashy here, which is a good thing for a doorbell accessory. The mount is a small black wedge that sits behind your existing doorbell. Once installed, it doesn’t really stand out; it just looks like part of the doorbell base. The black finish blends in well with most of the KAMEP-style doorbells, so you don’t end up with a weird color mismatch on your wall.
The shape is basically a slightly curved wedge that gives you the angle. You can rotate or flip how you install it to decide if you want the camera to look more left, more right, a bit up, or a bit down. It’s not a fancy ball joint or anything like that; you adjust by how you mount the bracket. That’s less flexible than a fully adjustable hinge, but in return it’s simpler and more stable once you’ve picked your angle.
One thing I noticed: the thickness of the mount pushes the doorbell out from the wall a bit. It’s not much, but if you already have a tight space (like a door that almost brushes the frame where the bell is mounted), you should check you have enough clearance. On my setup, the door still opens fully without hitting the doorbell, but it’s a bit closer than before. Visually, the extra depth isn’t shocking; it just makes the doorbell look slightly more “chunky”.
Overall, I’d call the design functional and discreet. No one is going to compliment you on your nice wedge bracket, but that’s not the point. It doesn’t rattle, it doesn’t move once fixed, and it doesn’t make the doorbell look weird. For me that’s a win: it does its job without drawing attention or making the setup ugly.
Materials: more solid than cheap plastic, but not indestructible
The product page insists a lot on the materials: waterproof, durable, with stainless steel screws. In hand, the bracket feels more solid than the usual thin plastic mounting plates that come with some budget doorbells. It’s still a lightweight piece, but it doesn’t bend easily when you try to twist it, which is reassuring given it’s going outside and will deal with weather and temperature changes.
The mount itself seems to be made from a tough plastic or composite, not metal, but that’s fine for this use. It’s not supposed to carry a lot of weight; it just holds a small doorbell in place. The important bit is that it doesn’t crack when you tighten the screws. I tightened mine firmly (not like a maniac, but more than “gentle”) and didn’t hear any creaks or see any stress marks. That already puts it ahead of some very cheap mounts where you can literally see the plastic whitening around the screw holes.
The screws are stainless steel, which is key outdoors. Normal screws can rust quickly, especially if your door is exposed to rain or salty air. I obviously haven’t had this for years yet, but after a few wet days there’s no sign of rust or staining around the screw heads. The raw material of the mount is also supposed to be waterproof; in practice that just means it doesn’t soak up water or deform. So far, it has stayed stable and flush against the wall.
I wouldn’t say this is built like industrial hardware, but for a 100 g bracket that lives under a porch or on an exterior wall, it’s more than enough. The main thing I liked is that it doesn’t feel flimsy. You screw it in, it stays put, it doesn’t flex. For this price range, that’s pretty solid. Just don’t expect miracles if you slam it with something heavy or mount it on a crumbling wall – it’s still a small piece of plastic plus screws, not a steel beam.
Holding up outside: weather, daily use and small knocks
I’ve had this angle mount outside for a little while now, exposed to normal weather: some rain, humidity, a bit of sun. So far, it hasn’t shifted, warped, or loosened. The doorbell still sits flush on the bracket, and the bracket is still tight against the wall. No cracks around the screw holes, no visible fading or chalking of the black surface yet.
Durability for this kind of product is mainly about two things: resisting weather and not moving over time. The material seems to handle moisture fine; water just runs off. The stainless steel screws are doing their job: no rust trails on the wall, no orange spots on the screw heads. I’ve pressed and wiggled the doorbell a few times to see if there’s any play in the mount, and it feels solid. No creaking or flexing when I press on the corners.
In day-to-day use, the bracket doesn’t really get touched much, but it does have to support the occasional bump when someone is clumsy or when I clean around the door. I wiped it down with a damp cloth once, and nothing moved. I also accidentally knocked the doorbell slightly while moving some boxes through the door; the angle mount didn’t shift at all, which is reassuring.
Obviously I can’t judge multi-year durability yet, but based on the feel of the material and the early signs, I’d say it’s reassuringly sturdy for the price. It’s not metal, so if someone really yanks on the doorbell or hits it hard, something will eventually give, but that’s true for most consumer doorbell mounts. For normal home use, I don’t see any big red flags so far.
Installation: easy if you know a drill, a bit fiddly if you don’t
Mounting this angle bracket is fairly straightforward, but you still need to be a bit methodical. In my case, I already had the J9 doorbell installed flat on the wall. I first removed the doorbell from its original plate, then held the KAMEP angle mount in place to see where the new holes would go. The kit includes wall plugs and screws, so if you’re going into brick or concrete, you just need a drill with the right bit size.
The instructions are short and not super detailed, so don’t expect a step-by-step guide with big pictures. They basically show you the main idea: fix the wedge to the wall, then fix the doorbell to the wedge using the provided screws. If you’re used to DIY, that’s enough. If you’re new to it, my advice is: mark your holes with a pencil, double-check alignment with the door frame, and only then drill. Also, test the angle by holding the doorbell in place and checking the camera view on your phone before you fully tighten everything.
The part that can be slightly annoying is aligning all the holes: wall, mount, and doorbell. Because the mount is small, there’s not a lot of room to “cheat” if your first holes are a bit off. I took my time, and it went fine, but I can see someone rushing this and ending up with a crooked doorbell. Once the screws are in, though, the whole thing feels stable and doesn’t wobble.
Installation time for me was around 20–30 minutes, including removing the old flat mount, marking, drilling, and remounting the doorbell. Not an all-day project, but not a 2-minute job either. Overall, I’d say the install is pretty accessible if you’re comfortable with a drill. If you’ve never drilled a wall in your life, you might want a friend to help or at least watch a quick video on installing wall plugs before you start.
What you actually get in the box
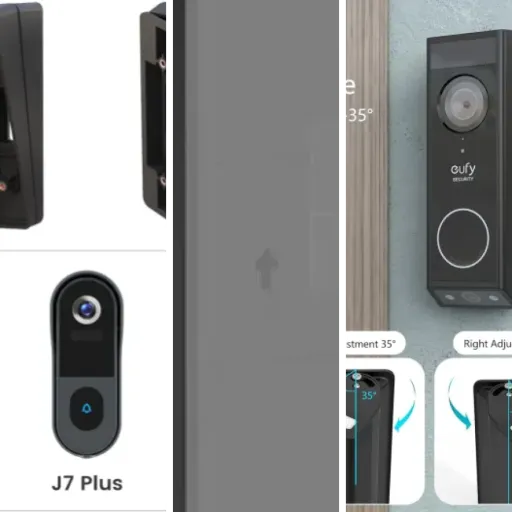
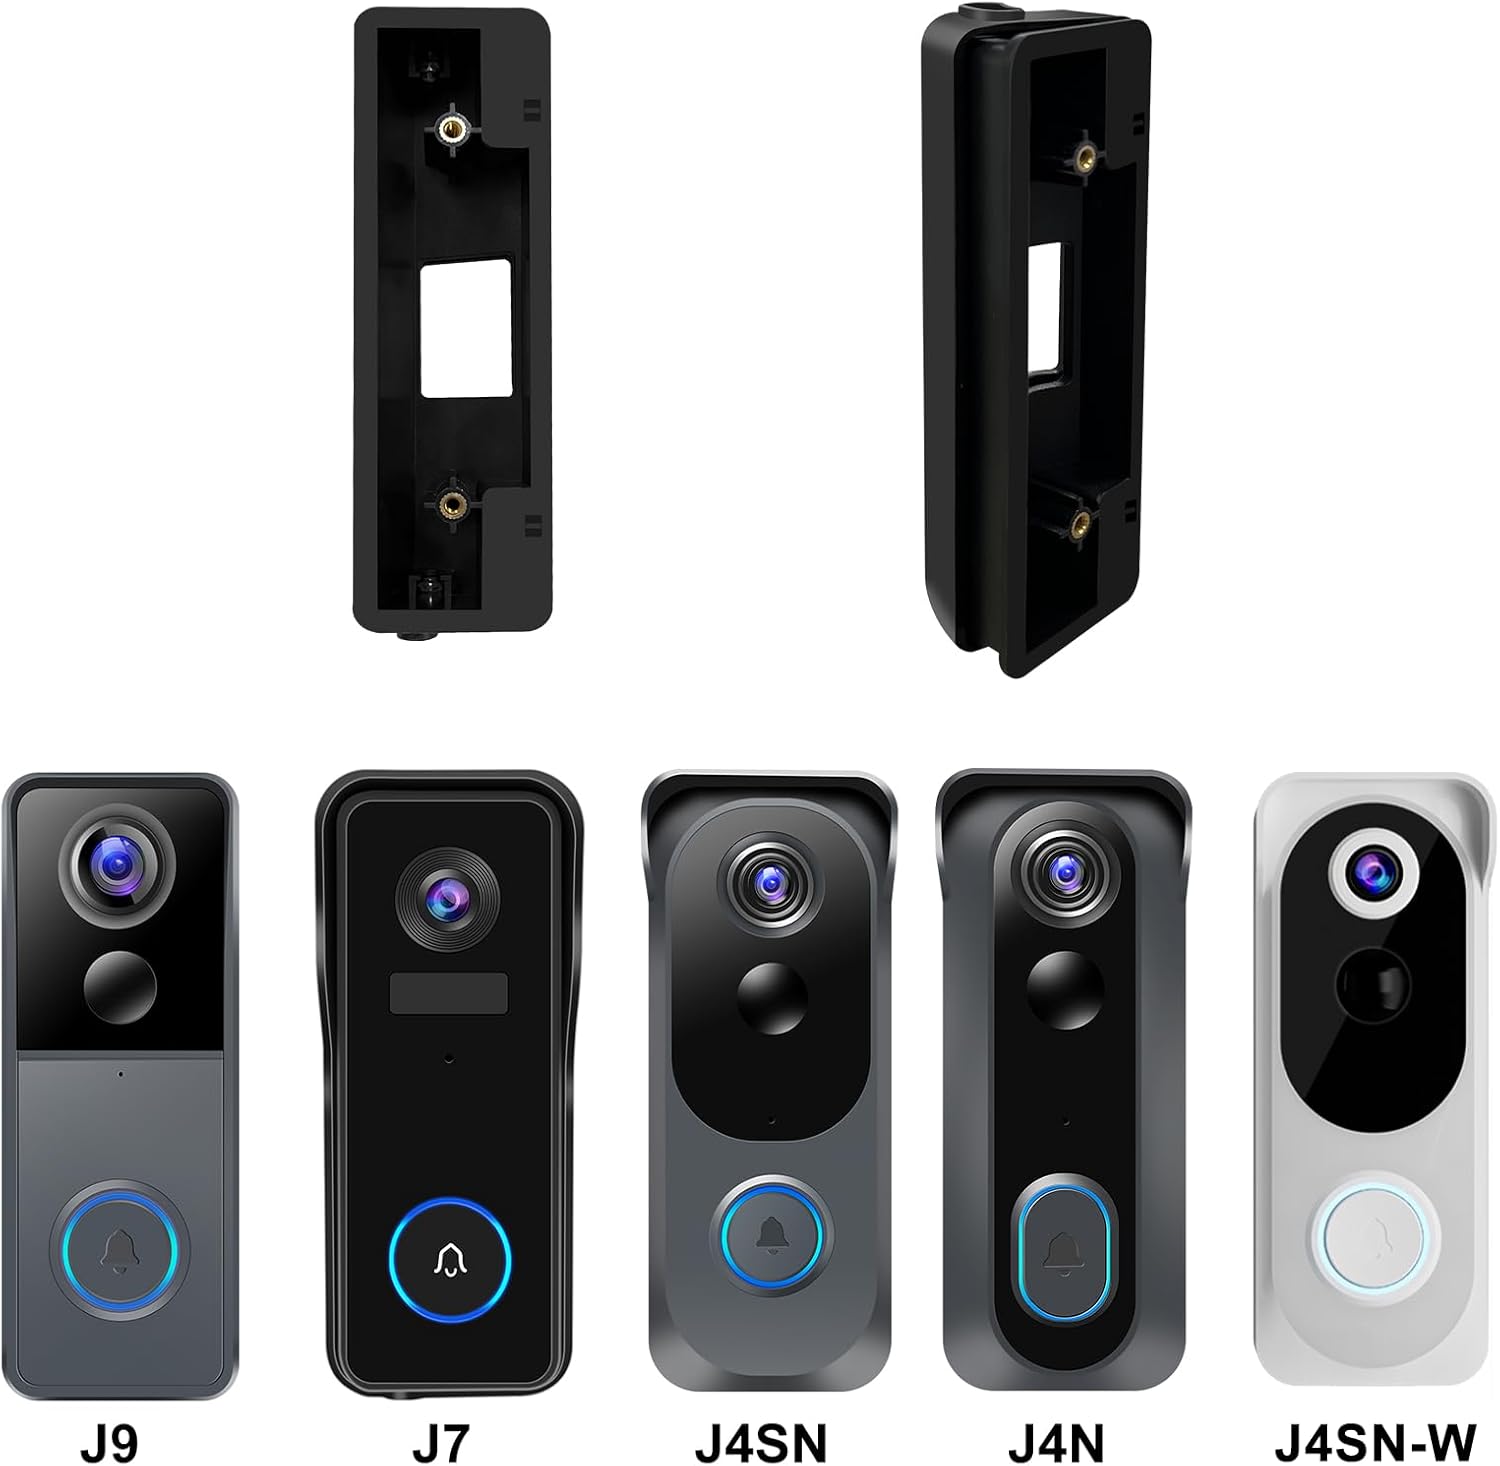
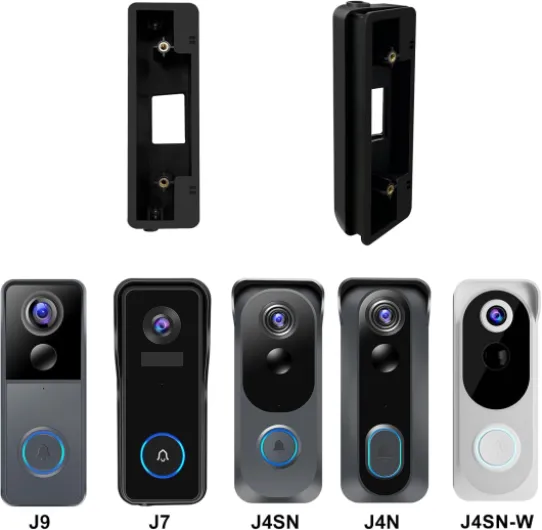
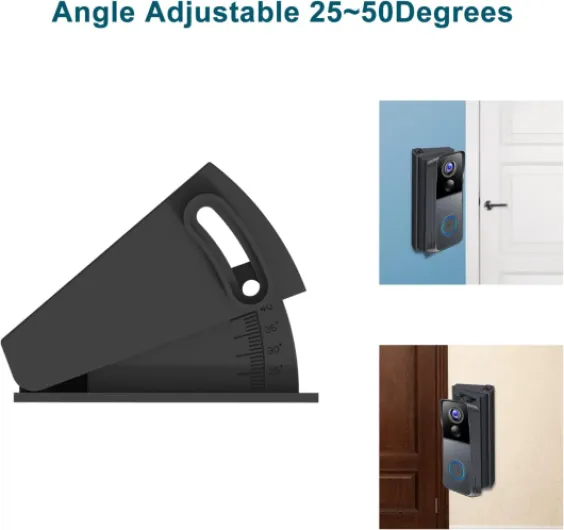
Out of the box, this is a pretty straightforward kit. You get the black angle mount itself, a few small pieces to adjust the orientation, and a bag of screws and wall plugs. No doorbell, obviously, just the bracket. The mount is compact, roughly 11 x 38 x 48 mm according to the specs, so it doesn’t look bulky on the wall. It’s made to sit between your wall and your J-series KAMEP-style doorbell (J9, J9 Plus, J9N, J7, J7K, J4SN, J4N, etc.).
The main idea is simple: the bracket lets you tilt your doorbell so the camera sees more of what you want. You can shift the angle sideways from about 25° to 50°, or tilt it slightly up or down (about 8–16°). In practice, that means you can choose whether you want to see more of the pathway, the street, or close to the door handle. It’s not some super advanced system, but the adjustment range is enough for most front doors that aren’t in a perfect position.
The instructions are basic but usable: small leaflet with a few diagrams, not a detailed booklet. If you’ve ever mounted anything on a wall (router, small shelf, other doorbell), you’ll manage. If it’s your first time drilling, you might have to read the steps twice and dry-fit everything before committing to the holes. One thing I appreciated: they do include all the screws you need, and they’re stainless steel, so for outdoor use that’s important.
The key point: this kit is very specific in compatibility. It’s only for the J-series style doorbells listed. It does not fit Ring, Blink, Tapo, eufy, or random generic doorbells. If you ignore that and hope it “might work anyway”, you’ll probably end up with misaligned holes and a mount you can’t use. So before buying, double-check your model name. If your doorbell matches the list, then this is basically a plug-and-play add-on to fix the viewing angle problem.
Does it actually improve the camera view?
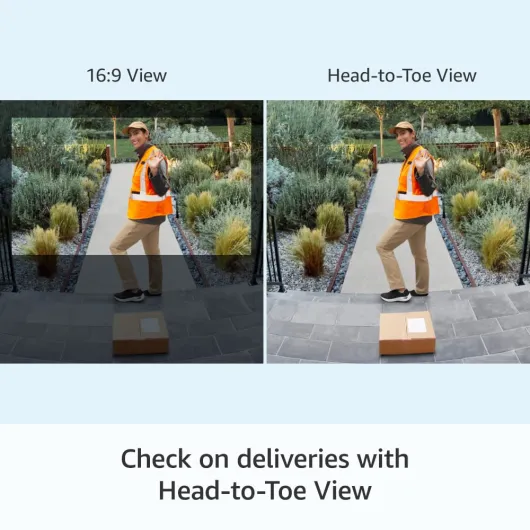
This is the main reason to buy this thing, so I paid attention to how much difference it made. Before installing the angle mount, my J9 doorbell was showing a lot of the street and almost cutting off people who stood close to the door. If someone leaned to the side of the frame, I only saw half their body. After mounting the bracket with about a 35–40° sideways tilt, the camera now covers my doorstep properly and much less of the road.
The manufacturer says you can adjust between 25° and 50° left or right, or 8–16° up or down. In practice, you’re not turning a dial to pick a precise degree; you choose how to orient the bracket and which pre-drilled holes you use. I’d describe it as a set of usable positions rather than continuous micro-adjustment. Still, the difference between “no bracket” and “with bracket” is very clear: the field of view shifts enough that the doorbell finally points where it should.
I tested a few positions before drilling the final holes: I held the mount and doorbell together with tape and checked the live camera feed on my phone. That’s what I recommend: dry fit first, drill after. That way you find the angle that best covers your door area, especially if your door is in a corner or recessed. Once I found the right position, I fixed it and haven’t had to touch it again. Motion detection also got better, because the camera now sees more of the path people actually take to get to my door, instead of cars going by.
Is it perfect? Not completely. If your door is in a really awkward spot (for example, very deep in a narrow alcove), the 25–50° range may still not be enough to catch everything. But for a standard front door that’s just off to one side or slightly angled, it gets the job done. Compared to using the doorbell flat on the wall, the improvement is clear and practical. For me, that’s exactly what I wanted from this bracket.
Pros
- Clearly improves the camera viewing angle on compatible J-series doorbells
- Feels sturdier than typical thin plastic mounts, with stainless steel screws for outdoor use
- Compact, discreet design that doesn’t make the doorbell look bulky or strange
Cons
- Very limited compatibility: does not work with Ring, Blink, Tapo, eufy or other brands
- Instructions are basic and angle choice isn’t super precise, so installation needs some trial and error
Conclusion
Editor's rating
For what it is, the KAMEP Angle Mount does its job: it lets you point your compatible J-series video doorbell in a more useful direction without redoing the wiring or drilling a completely new spot. The viewing angle improvement is real and quite noticeable. In my case, I went from a camera mostly pointed at the street to a proper view of the doorstep and the path people actually walk on. The bracket feels solid enough, the screws are stainless, and after exposure to weather it’s still firmly in place.
It’s not perfect. The instructions are basic, the angle adjustment isn’t ultra precise, and the compatibility is very narrow: only for specific KAMEP-style J models, not for Ring, Blink, Tapo, eufy, or others. Installation is doable for most people but still requires a drill and a bit of patience to align everything correctly. If you expect some magic adjustable hinge with millimetre precision, this isn’t that. It’s a simple wedge with a few mounting options.
If you already own a compatible J9/J9 Plus/J9N/J7/J7K/J4SN/J4N doorbell and you’re annoyed with the current camera angle, this mount is a practical, reasonably priced fix. If your view is already fine, or if you’re not on a supported model, you can skip it and look for something else. Overall, I’d rate it as a solid, no-frills accessory that improves usability without trying to be more than it is.